Build a YouTube Queue with Next.js: Part 2


Khalea B. / June 17, 2021
10 min read


Intro
If you've completed part 1, you're ready to add some new features! In this tutorial, we'll be adding search using the Axios HTTP client and YouTube's API, as well as the ability to add search results to the queue.
Prerequisites
- Completed Part 1
- Get a YouTube Data API v3 key — follow steps 1-3
Search UI
Let's think about how to structure the search feature. We want to use a search bar to submit a query, and results should appear beneath the bar with each title, channel name, and thumbnail. Each result should have a button that can add the video to the queue. This tells us several things about the search component's structure:
The queue and search results need to share data → We should pass a queuing function down to the search results from their highest common ancestor, the
Homecomponent inindex.js.The search bar initiates a query that should serve data to a results component → We should hold the search bar and search results within one container. The container should hold the state of the results data. Lastly, the container should pass down a search handler that updates results to the search bar.
Let's start by adding a file called searchContainer.js to the components folder. Import useState from react, and create a new functional component called SearchContainer that accepts props. Implement a state hook for an array of search results that has an empty array as a default value:
import { useState } from 'react'
export default function SearchContainer(props) {
    const [searchResults, updateSearchResults] = useState([])
}
Add a file called searchbar.js to the components folder. Create a new functional component called SearchBar that accepts props. We will return a simple search bar with a magnifying glass SVG button.
export default function SearchBar(props) {
    return (
        <div className="relative w-1/2 mb-4">
          <input
            type="text"
            placeholder="Search"
            className="px-4 py-2 border border-gray-300 focus:ring-blue-500 block w-full rounded-md bg-white text-gray-900"
          />
          <button>
            <svg
                className="absolute right-3 top-3 h-5 w-5 text-gray-400 dark:text-gray-300"
                xmlns="http://www.w3.org/2000/svg"
                fill="none"
                viewBox="0 0 24 24"
                stroke="currentColor"
            >
                <path
                strokeLinecap="round"
                strokeLinejoin="round"
                strokeWidth={2}
                d="M21 21l-6-6m2-5a7 7 0 11-14 0 7 7 0 0114 0z"
                />
            </svg>
          </button>
        </div>
    )
}
Import and add it into the SearchContainer:
import SearchBar from './searchbar'
export default function SearchContainer(props) {
    const [searchResults, updateSearchResults] = useState([])
    return (
        <div>
        <SearchBar />
        </div>
    )
}
Import the SearchContainer intoindex.js. Wrap the section with the Player and Queue components in a div that has flex flex-col styling:
import SearchContainer from '../components/searchContainer'
<main>
    <div className="flex flex-col">
        <div className="flex flex-row">
            <Player videoId={currentVideoId} onEnd={playNext}/>
            <Queue data={videoData}/>
        </div>
        <SearchContainer />
    </div>
</main>
Refresh http://localhost:3000/, and you should now see the SearchBar beneath the Player.
Search API
Before we add the results component, let's set up search with the YouTube API. We'll be making use of the Axios HTTP library in order to simplify the API request process. Using the CLI, run the following in your project directory:
npm install axios
In the pages > api folder, add a file called search.js. Import the axios library at the top. Declare variables youtubeAPI and apiKey containing the YouTube search endpoint and your API key:
import axios from 'axios'

const youtubeAPI = 'https://youtube.googleapis.com/youtube/v3/search?part=snippet&q='
const apiKey = 'YOUR_API_KEY'
Note: When deploying an app onto the internet, you'll want to conceal your API key. You can use environment variables with Next.js apps deployed with Vercel as an alternative to hard-coding keys. Learn more about environment variables with Next.js here.
Now create the GET request with Axios:
export const searchVideos = (query) => {
    const url = youtubeAPI + query + '&type=video&key=' + apiKey

    return axios.get(url)
        .catch(function (error) {
            console.log(error)
        })
}
In searchContainer.js, import searchVideos from the pages > api folder. Create a function variable called handleSearch that takes a query, searches for videos, and uses updateSearchResults. Add a handleSearch prop to the SearchBar component in order to pass down the ability to update results:
import { searchVideos } from '../pages/api/search'
const handleSearch = async (query) => {
        const response = await searchVideos(query)
        updateSearchResults(response.data.items)
  console.log(response.data.items) // See results in browser console
    }
<SearchBar handleSearch={handleSearch}/>
In searchbar.js, add a state hook for the value of input field so it can be shared with the search function:
import {useState} from 'react'
const [input, setInput] = useState('')
<input type="text" onChange={(e) => setInput(e.target.value)} ... />
Add an onClick prop to the magnifying glass button that initiates the handleSearch function:
<button onClick={() => props.handleSearch(input)}>
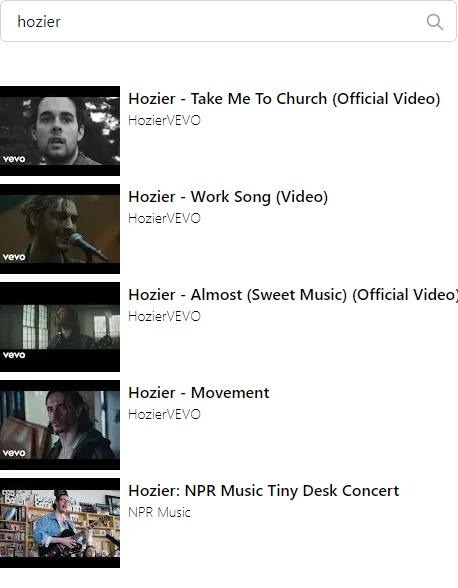
Now in http://localhost:3000/, search for a music video. Check the browser console and you should see a JSON object containing metadata about the top 5 results. Look through the data, and see what information is available. Here is a shortened JSON response from searching 'Hozier':
{
  "kind": "youtube#searchListResponse",
  "etag": "4zACJes6LjRa7-qKJPB6DR_0si8",
  "nextPageToken": "CAUQAA",
  "regionCode": "US",
  "pageInfo": { "totalResults": 16515, "resultsPerPage": 5 },
  "items": [
    {
      "kind": "youtube#searchResult",
      "etag": "bAEkzy_M-jxlV6eogJ73TfGEPok",
      "id": { "kind": "youtube#video", "videoId": "HlLx7oE7q3I" },
      "snippet": {
        "publishedAt": "2019-03-06T14:58:15Z",
        "channelId": "UCdOcBpu5O2V0JhFFs9k-Ouw",
        "title": "Hozier - Dinner & Diatribes (Official Video)",
        "description": "Featuring Anya Taylor-Joy & Andrew Hozier-Byrne Directed by Anthony Byrne Executive Producer - Jess Wylie Producer - Fred Bonham Carter Director of ...",
        "thumbnails": {
          "default": {
            "url": "https://i.ytimg.com/vi/HlLx7oE7q3I/default.jpg",
            "width": 120,
            "height": 90
          },
          "medium": {
            "url": "https://i.ytimg.com/vi/HlLx7oE7q3I/mqdefault.jpg",
            "width": 320,
            "height": 180
          },
          "high": {
            "url": "https://i.ytimg.com/vi/HlLx7oE7q3I/hqdefault.jpg",
            "width": 480,
            "height": 360
          }
        },
        "channelTitle": "HozierVEVO",
        "liveBroadcastContent": "none",
        "publishTime": "2019-03-06T14:58:15Z"
      }
    }
  ]
}
Search results
We can fetch results, now we just need to present them to the user! We'll create a reusable card component for each result, and map them all into a list. Each card should display the title, channel name, and a thumbnail image of a video. We'll be making use of the next/image component in order to optimize thumbnail images.
Start by adding a file called searchlist.js to the components folder. Import Image from next/image and create a functional component called SearchList that accepts props. Declare a variable called results that holds a prop called data:
import Image from 'next/image'
export default function SearchList(props) {
    const results = props.data
}
Now we'll use JSX and Array.map to list the search results. The layout should have the thumbnail on the left, with a vertical stack containing the title and channel name to the right:
return(
    <div>

        {
            results.map(item => {
                return(
                    <div key={item.id.videoId} className="flex flex-row py-1 space-x-2">
                        <Image
                            src={item.snippet.thumbnails.default.url}
                            alt="Music video thumbnail"
                            width={120}
                            height={90}
                        />

                        <div className="flex flex-col">
                            <h3 className="text-md font-semibold">{item.snippet.title}</h3>
                            <p className="text-sm font-light">{item.snippet.channelTitle}</p>
                        </div>
                    </div>
                )
            })
        }

    </div>
)
Note: We need to ensure each item has a unique key so that React can track changes for individual items. Since the API returns unique results, we use the video ID.
Import the SearchList component into the searchContainer.js file. Add SearchList into the container, and give it a prop called data that takes searchResults:
import SearchList from './searchlist'
<div>
    <SearchBar handleSearch={handleSearch} />
    <SearchList data={searchResults} />
</div>
Before we are able to view the results, we'll need to create a next.config.js file. External URLs are so when we use images from an external entity, we need to whitelist the domain. In the root of your project directory, create a file called next.config.js and add the following:
module.exports = {
    images: {
        domains: ['i.ytimg.com']
    }
}
Restart the development server with npm run dev. Search for a video, and now you should see your results!

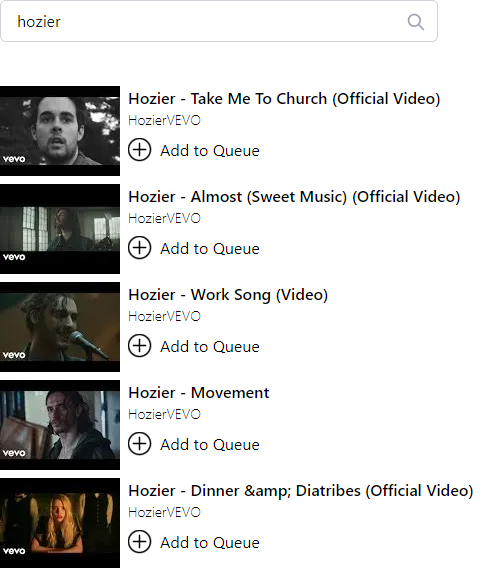
Adding to the Queue
All that's left is to select videos from the search results and add them to the queue. Since data will need to be shared between SearchContainer (where search results are stored) and Queue, we will add a queuing function to their highest common ancestor (Home) and pass it down to the SearchList.
Open index.js and create a function variable called addToQueue that takes a video as an argument. video is the JSON metadata for a YouTube video returned from the API. We will simply spread the videoData array and append the new video to it. Then, if the queue was previously empty and no song was playing, we'll set the currentVideoId to the newly added video:
const addToQueue = (video) => {
    console.log(video)
    updateVideoData(videoData => [...videoData, video])

    if (currentVideoId == null) {
        updateCurrentVideoId(video.id.videoId)
    }

}
Pass this prop down to SearchContainer, and then down to SearchList:
// index.js
<SearchContainer queueFunc={addToQueue} />
// searchContainer.js
<SearchList data={searchResults} queueFunc={props.queueFunc} />
In searchlist.js, add a button to the vertical stack containing the video title and channel title. Give the button an onClick prop that uses the queueFunc that was passed down:
<div className="flex flex-row space-x-2 pt-2">
    <button onClick={() => props.queueFunc(item)} className="w-auto h-auto">
        <svg width="24" height="24" xmlns="http://www.w3.org/2000/svg" stroke="currentColor" strokeWidth="0.5" fill="currentColor" fillRule="evenodd" clipRule="evenodd"><path d="M11.5 0c6.347 0 11.5 5.153 11.5 11.5s-5.153 11.5-11.5 11.5-11.5-5.153-11.5-11.5 5.153-11.5 11.5-11.5zm0 1c5.795 0 10.5 4.705 10.5 10.5s-4.705 10.5-10.5 10.5-10.5-4.705-10.5-10.5 4.705-10.5 10.5-10.5zm.5 10h6v1h-6v6h-1v-6h-6v-1h6v-6h1v6z"/></svg>
    </button>
    <h2 className="m-0">Add to Queue</h2>
</div>
Now you can add new videos to the queue!
Conditional Rendering
As of now, when the last video in the queue plays, it will remain listed in the queue and any songs added after it ends will not autoplay (though they'll be reflected in the queue).
This is because the currentVideoId stays the same since we only update the ID if the size of videoData is greater than zero. Furthermore, shifting (removing the first element) videoData directly will not trigger a UI update, however modifying the data with updateVideoData will.
Set the initial state of videoData to be an empty array, the initial state of currentVideoId to null, and remove the TestQueue import from index.js:
const [videoData, updateVideoData] = useState([])
const [currentVideoId, updateCurrentVideoId] = useState(null)
Alter the Home component to conditionally render the Player when the videoData array is not empty. Otherwise, we'll render an empty div with a gray background:
{videoData.length > 0 &&
    <Player videoId={currentVideoId} onEnd={playNext} />
}

{videoData.length === 0 &&
    <div className="block px-64 py-48 bg-gray-300 rounded" style={{width: '640px', height: '360px'}}>
        <h2>Empty Queue</h2>
    </div>
}
Update the playNext function to use updateVideoData with slice instead of shift. Using the useState setter function will trigger a UI update where, in the case of an empty videoData array, the Player embed is replaced (as there is no video ID given) and the Queue is cleared:
const playNext = () => {
    updateVideoData(videoData.slice(1))

    if (videoData.length > 0) {
        updateCurrentVideoId(videoData[0].id.videoId)
    }
}
Conclusion
Nice! You've now integrated search with the YouTube API and added the ability to add search results to your queue! In part 3, we'll see how we can leverage websockets for real-time video sync. This code is also available on Github.